I’ve mentioned them often enough, we might as well get busy and put them back into the boat. The original bulkheads were nicely built but had two problems for longevity. One, they were nailed together with galvanized finish nails. This wasn’t awful, but 50 years in a marine environment has its impacts. Second, they were made with sound deadening insulation. They were sort of double-planked like the hull. There was a rabbet cut into the timbers that supported the bulkhead in which was laid half-inch fiberboard that looked like it was compressed hemp or coconut fiber. It was what they had available at the time and had done a good job of deadening the sound. But too many years in a marine environment and a leaking cabin roof had caused the stuff to swell and it was pushing the 1/4-inch ply off the face of the bulkheads. These things were built like a vault with beveled doors that shut tight enough to use for an icebox. But it was time for them to come out.
I’ll just take a moment to comment that bulkheads in a boat are for more than privacy. They are important structural components and need to be stiff. They keep the hull from flexing. Imagine a piece of tubing like a straw and what it looks like when you bend it. The shape has to collapse in order to bend. If the straw had bulkheads in it to keep it from collapsing, it would be considerably stronger. That’s the basic idea.
The plan I had to put them back in was to make foam cored panels. Light and stiff. I’d done some experiments with foam board from the lumber yard. The stuff we get here (or some of it) is pink foam made by Owens Corning. I’d been doing experiments with this stuff in the shop and testing it for strength.

In the drawing above, if you imagine that the black lines are half inch plywood cut into 1-inch strips and laid on edge. The pink is 1-inch construction foam. The panel size is 4 X 4-feet. Over this, I glued 1/4-inch ply with West System epoxy. You can buy special marine foam for projects like this. If we were gluing up a deck, it would probably be worth it. But I wanted to try this out. My primary criteria being that the foam was closed cell so it could not absorb moisture. So I made the panel and tortured it to see what I had to do to break it.
My first test was to lay it, like a bridge across a couple of beams and then to launch my considerable bulk off the top of the work bench, slamming the heels of my boots into the panel when I landed in the center of it. I bounced off. You might wonder about me doing this kind of stuff at work, but we had an exhaust fan on the roof that was driving the lab director bonkers with the vibration and noise. So I had been tasked with figuring out how to isolate it from the roof. This work was all related to that. I just happened to pick materials that might also work for my project. It was one of the wonderful things about where I worked.
I ended up driving the forklift over this to break it. I was pretty well convinced it was durable. I also glued up a 1 X 4-foot panel that had an arch in it. Perhaps two inches at the center. It had no timber reinforcing in it. It turned into my favorite fatigue mat to use when I was stuck at a piece of machinery for long periods, standing on the concrete floor. The arched panel was stiff enough that it would not touch the concrete in the center unless I bounced on it. I used that panel for years.
So this is the method I used for my new bulkheads. I cut 1/4-inch ply to fit the space on the boat. Then I glued 1 X 1-inch yellow cedar to it for stringers, around the edge and at intervals across the face. The forward bulkhead has a window and a door. The door is for access to the forward berth, the window so that you can lay in the bunk and see the cockpit. It also allows air to circulate through the boat. The aft bulkhead has a door, to port, for access to the head and on into the forward berth, and is open on the starboard side to give access to that space from the salon. So these shapes where outlined in timber stringers as well. The two bulkheads have a longitudinal bulkhead joining them to provide privacy in the head, but that is getting ahead of ourselves.
So I had one ply wood panel with timber stingers glued and then nailed using monel ring-shank nails. Then 1-inch pink foam board was glued into the spaces between the stringers and a second face glued and nailed on. The finish panel being 1-1/2-inch.
The panels would not go into the boat in one piece. So I developed these in a modular fashion so that they could be taken down to the boat in two or three pieces each and then get the final glue-up in place. The joints where these were put together were made like tongue-in-groove with the ply of one panel overlapping the timber of the next. This process required a lot of trips to the boat to fit the panels and get everything set up but I’m not sure how else I might have done it unless I used traditional timber frame methods to build these panels.
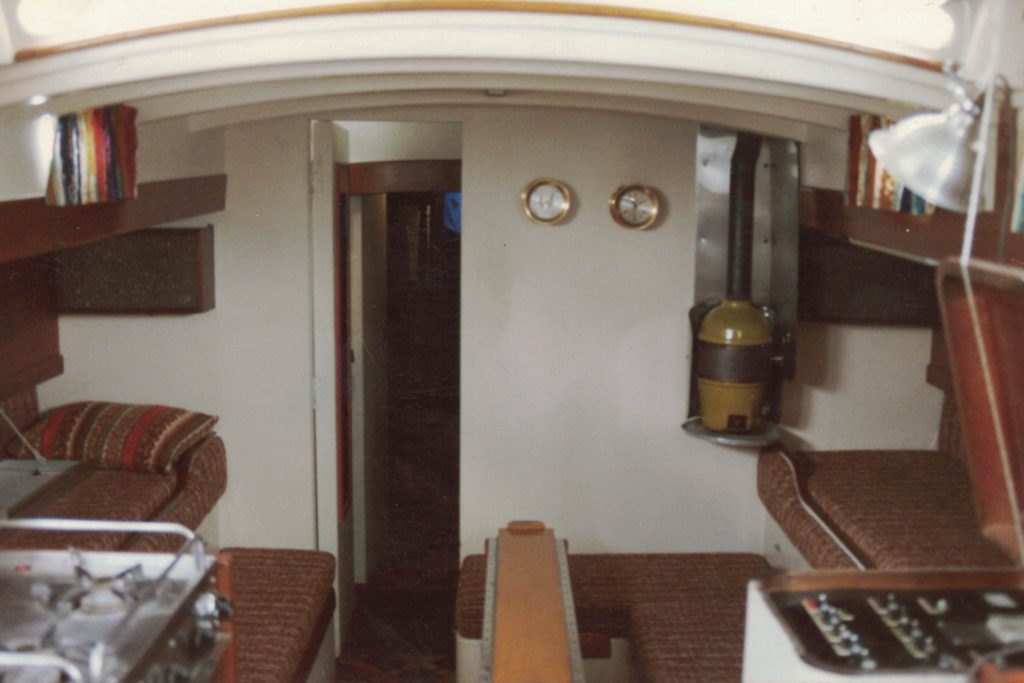
The above photos shows what the aft bulkhead looked like while the boat was owned by the Hylands. This is as Dooley built it. The starboard bench for the settee wrapped around along the base of the bulkhead and provided storage. I’d had to tear this out to get the tanks out of the bilge and to remove the bulkhead. I do not know when the oak drop leaf table was made. The ceramic wood stove dates to the same era as the carpet and the Formica. It was kind of cool, as it turned orange to red depending on how hot it got, but it was cracked by the time we came along. The forward bulkhead was the same, other than the door was shorter due to the bridge deck at the mast. It can be seen through the open door.

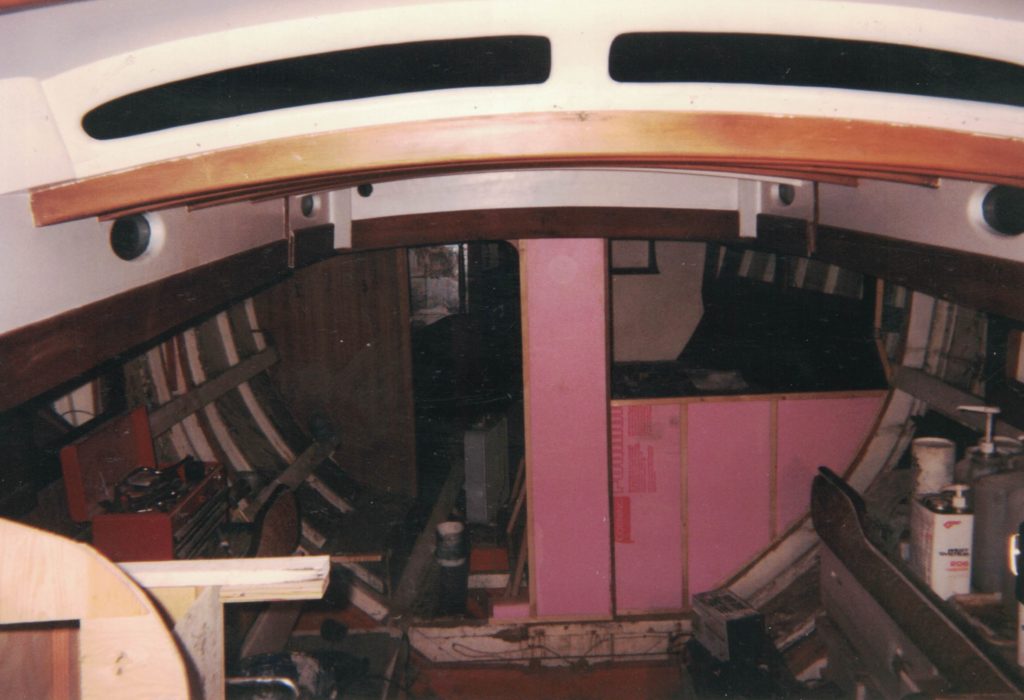
In the photo above we can see this space with both bulkheads removed. We are standing in the galley looking forward. The same photo is below. I’ve marked it up so that it will be easier to see some details that are visible.

It was fairly easy for me to figure out what was original and what had been added later. Dooley and Sandy had ensured every stick of wood put into the boat was covered with red lead paint. They had purchased red lead in powder form and mixed up their own paint with linseed oil. So what we are looking at on the right where I have labeled “red lead” and “raw wood” is the aft end of the double bunk that is in the forward berth. The new bulkhead will butt up against it. The red lead is part of an original bunk that was used as a platform to build a double bunk with a set of drawers below. It is all mahogany faced. Someone did some nice work, except all the wood used was untreated, both timber and ply. This is sort of amazing. I’ve since soaked deck oil into most of it, although there are probably places I haven’t reached. This was the theme throughout the boat. Any new construction had beautiful faces, raw timber underneath.
Where I have labeled the above “hanging locker” what you are looking at there is the forward end of a hanging locker that is opposite the bunk. The aft end of that locker is formed by the forward bulkhead. Where I have labeled the “original bulkhead” is the separation between the forward berth and the vee berth. I believe the vertical trim here to be matai. In the photo the port side had mirrors glued to it. The starboard side is actually a locker, so the starboard side section of the vee berth is shorter. I do not have photos that show this space as built but it is my understanding that there were pipe berths to port and sail storage to starboard. It would have been crowded and a lousy place to sleep while on a passage. The truly good sea bunks are the settee bunks that are outboard on each side of the salon.
I don’t have photos of the original layout forward, but have a description that was written for N.Z. Sportsman. It puzzles me some based upon what I know. It says there are two adjustable bunks in the main salon and the two settee bunks. I think that what is likely is that there were lee cloths set up in a pipe berth style arrangement on the benches in the salon. The benches would not have been adjustable.
Forward in the area we call the main berth the description says there was a double bunk (also mentioned in Erica’s diary) which I believe is the shelf I have labeled with “red lead”. There were apparently two adjustable berths here as well, exactly how that was done I don’t know. I never got Dooley to draw a picture of it but he refereed to them as bunk beds, probably to make it easier for me to envision. The description reads that there was also a settee in this area, which was probably a single berth. They could also use the navigation table on the starboard side of the galley area as a bunk. Sometimes they had large crews on board. They also carried large sail inventories. I’m not sure how they fit it all in!
Anyway, this has little to do with building bulkheads, but if you have read this far into this whole narrative, I will assume that the above holds some interest for you. If not you have probably given up long ago.
In the above photo the panels are being fitted for the forward bulkhead. It shows clearly the pink foam board and the yellow cedar stringers. I chose clear yellow cedar as it is readily available locally and is good wood for this kind of construction. Highly rot resistant and much denser than redwood or red cedar, which are part of the same family (cypress). Yellow cedar also has a distinct odor that is wonderfully aromatic, but causes allergic reactions in some people, primarily while milling or sanding it. Regardless, I love working with it. What we are actually looking at in the above is a panel that was made just to cover the end of the bunk. This moved my bulkhead aft 1.25-inches. On the right you can see the white painted timber that was fitted to the hull for the original bulkheads. I was able to reuse it for fitting to the hull, on both port and starboard of both bulkheads. My bulkheads where much narrower than the original so I was able to use this timber despite the extra panel included here. The center upright panel is actually in the foreground of the other. There was some issue with clearing the mast that I will get into below, but that panel on the right was not really needed for strength but was for filling the space.
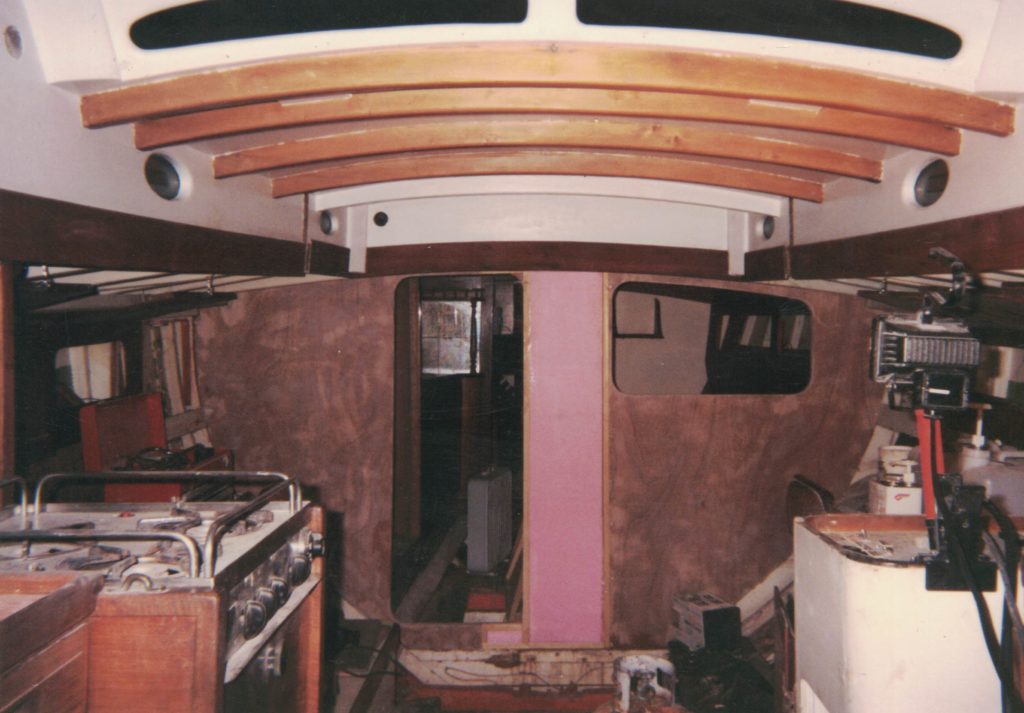
In this photo the three panels across are in place. The center still shows the pink foam. The panel to the right clearly shows the opening or “window”. We decided that privacy is an illusion on a boat anyway and I liked being able to see the galley and cockpit from the bunk. Additionally we have tried to ensure that air can move through the boat, both for crew comfort and to help keep the boat dry. To the left of the pink foam the comanionway opening is clearly visible. Through the companionway there is the appearance of another window but it is the mirror panels glued into the dresser arrangement in the forward berth. It took a while before I tore them out. The kauri roof beams with their fresh varnish look pretty good against the fresh cabin paint. I’m glad we went through that effort. Also in the above photo, I notice the stove top is covered in white dust. This means that I was probably also sanding and fairing the primer on the deck. Lots of sanding, lots of dust, what a mess!
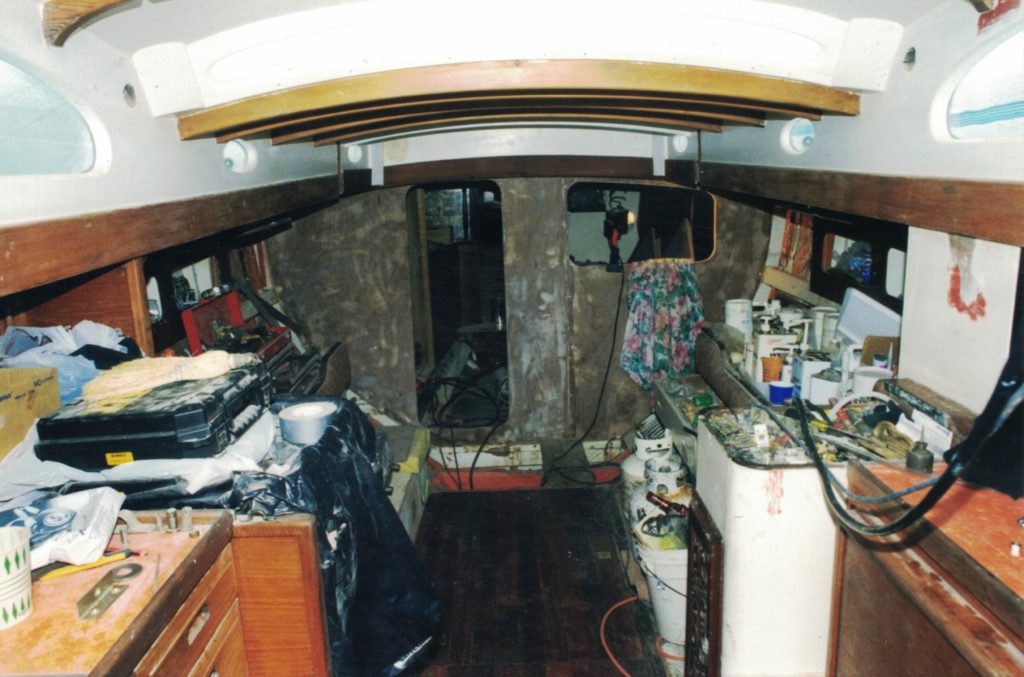
In the above photo the forward bulkhead is pretty much ready for paint and trim. I still had to fit the aft bulkhead which was a repeat of the same process with a few variations. I notice that the cabin sole is in place in this photo. Sitting on the counter is a bracket I made for the exhaust from the engine, so apparently I was taking care of details on that installation. We still didn’t have plumbing or electrical. The light in this photo is mostly natural (the exception being the clamp on light facing forward at the bulkhead). Leda’s doghouse with her large windows lets in a lot of light and provides good visibility.
Let’s talk about that interference fit between the mast and the bulkhead. Dooley reported that when Leda was launched she was bare inside. I don’t know if this means no bulkheads or not as I never thought to specifically ask. Nor am I sure as to what the design criteria was that placed her forward bulkhead exactly where it was, but in order to fit it, it had to be built so that the forward side had an open space in the plywood paneling to accommodate the mast. Quite literally there was an open space in the bulkhead there where the interior of the bulkhead was visible. This was one of the big issues that created my project of building new ones.
In 1949, and years after, the treatment at the mast partners (deck opening) was to fit wooden blocks around the mast to wedge it into place. The opening has to be big enough so that the mast can be removed and the blocking needs to be removable to do this. So the deck opening is probably two inches bigger in diameter (or whatever you call it when the shape is oval) than the mast. Then a “boot” is made to keep water from going down this hole. It was probably made of canvas and painted to waterproof it. Over the years, lots of variations have been done on this theme. Regardless this is one spot that often leaks on a yacht. I know Erica commented on the bunks getting wet, if memory serves she wrote about it after the Tasman Race and makes comment on it early on in the Pacific diary. What this means is that for 50 years any leaking around the mast got inside the bulkhead. It was in much worse shape than the aft bulkhead due to this.
I don’t remember much about how the mast was sealed when we bought Leda. There was a blue canvas cover, which would have been mostly for UV protection. What we have there now is a more modern concoction. There is a product made which is mast bedding compound. You use clay to seal the bottom part of the mast opening and pour in this mixed up goop. It forms a rubbery compound that holds the mast in place in lieu of wooden wedges. I have tried various themes on the top side to seal it up, presently I have a boot made from some old heavy duty rain gear that is wrapped around the mast and the deck ring in an inverted cone shape. It is sealed to both the mast and the ring using silicone stretch tape and then a canvas UV cover over this. So far so good. Nobody likes a wet bunk. Any commentary here about the bulkhead getting wet from this area leaking is not to find fault. Anybody who has been there knows this is a hard spot to keep sealed.
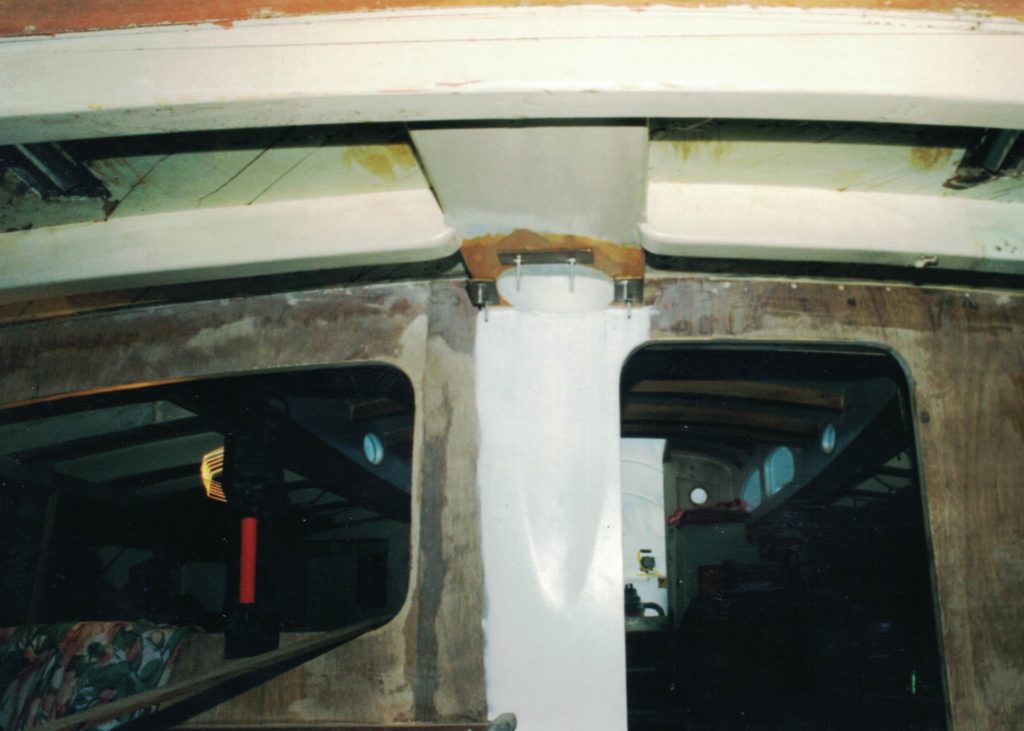
Above is the forward side of the bulkhead. Remember, I’d moved it 1.25-inches aft to help accommodate the mast. I still needed a little more room. What this tells me is that Dooley needed about 2-inches on his original bulkhead which was most of its thickness. What I decided to do can be seen above. I used my 6-inch disc sander and created an oblong hollow in the forward side of the bulkhead. The mast sits with a rake, so the hollow does not need to be full length. The mast also tapers, which also helps. This hollow left the pink foam exposed, so I covered it in fiberglass and epoxy. I painted it presumably because I knew I wasn’t going to get the whole thing painted before the mast went in and I didn’t want to have to reach behind it to paint. This also tells me that I must have been getting close to thinking the mast would go in. The brass plates with the bolts sticking through are for backing up the mast ring which is bolted on to the deck. I made one of stainless steel with ears on it so that we could attach shackles as needed. I also note that the deck prisms are in place here. So the deck is getting finished off. We will eventually get back up there for a look around. Speaking of the deck prisms, it surprises me how many people come on board who have never seen one.
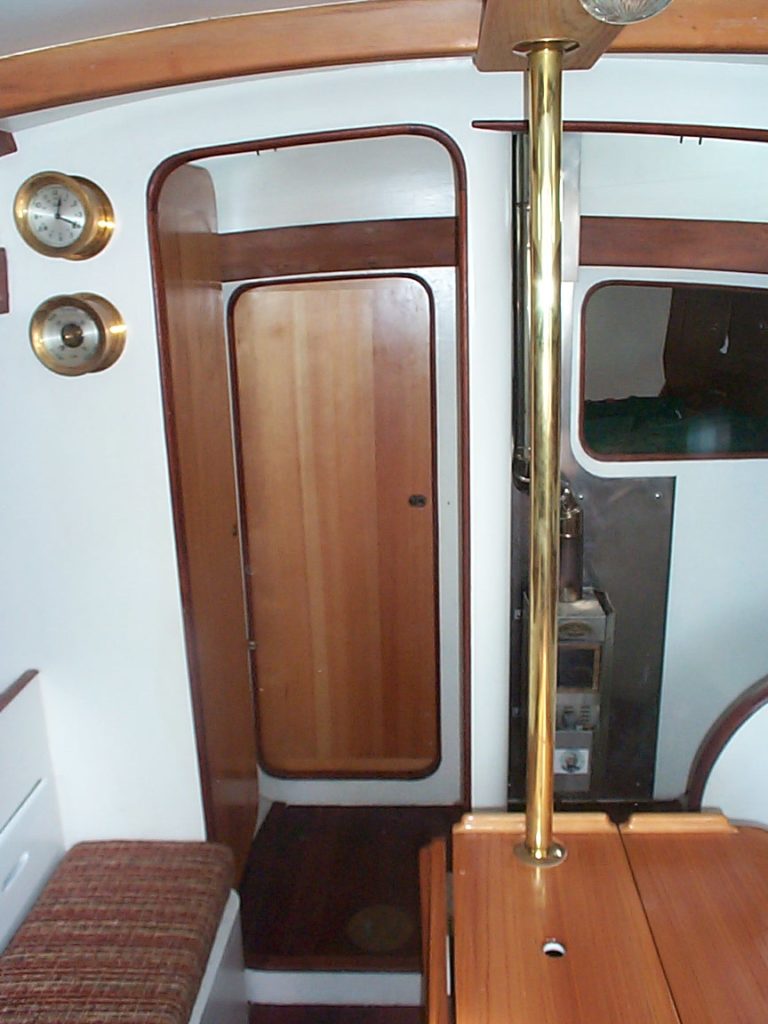
Above is how this whole thing looks now aside from new cushions. The companionway doors are in place, made from kauri sourced on our trip to New Zealand in 1997. Dooley helped me build the blanks for these doors in his backyard. There is more about this story in the section Visiting New Zealand. I’ll briefly comment here that this lumber was scattered down Highway 1 when I wrecked Dooley’s car. To make these doors we had to pick the gravel out of the surface and plane out the scars. We threw away Dooley’s car and proceeded with the project, treating it as collateral damage.
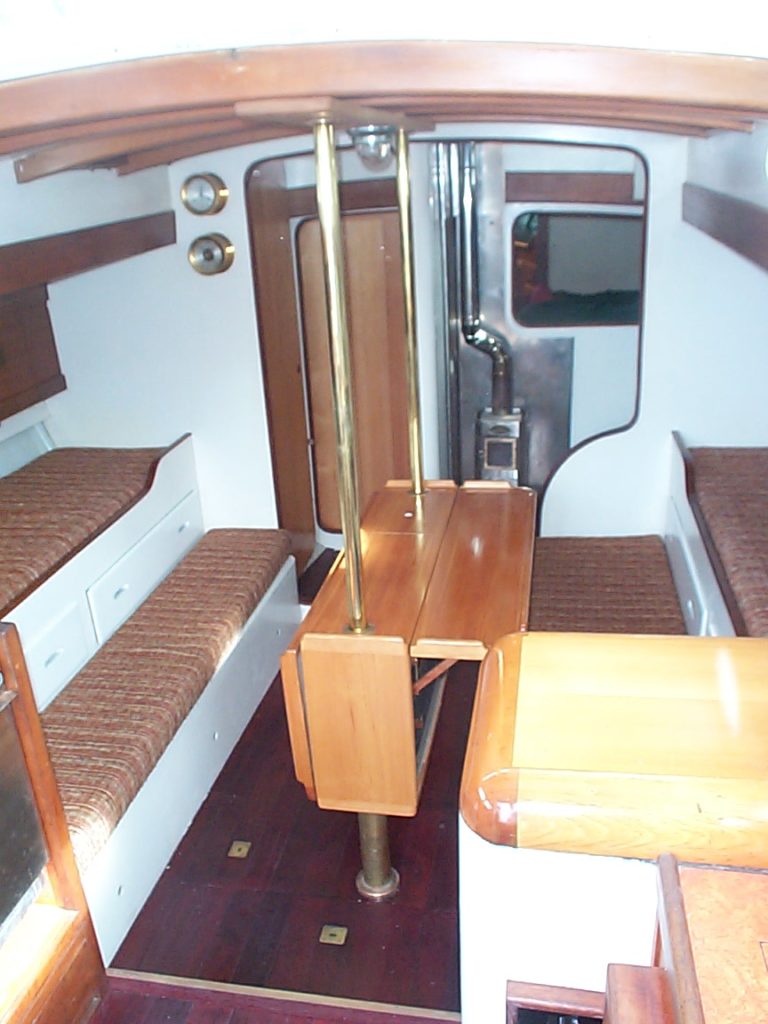
Above shows the opening in the starboard side of the aft bulkhead where the diesel heater can be seen. The window in the forward bulkhead is visible. The trim is in place, made from merbau. The cabin sole is complete, and the salon table is in place. This table was not actually built util after 2000, as that was the trip to New Zealand during which we sourced the wood to make it. I suppose I might do a section on the table alone as a boat project, but it is made as a box for storage with a wine rack and room for essentials, like whiskey inside. In the foreground right, the top of the phonograph cabinet has been rebuilt and is varnished up showing off more kauri. This originally had a plywood panel (probably kauri faced) and at some point had been stained dark. For some reason people liked dark wood during the 70s. I removed the plywood panel, used some of the kauri I brought home to make a timber panel and finished it bright to show off the wood. As I’ve said, what’s the point of having a boat built of kauri if you don’t get to show some of it off. It’s beautiful wood.
Had enough for now? Me too. We will get back topside soon.
Next: Cockpit and Decks
Previous: A Little Bit of Sole